


Content ITV PRO
This is Itvedant Content department
Learning Outcome
4
Implemented image and file uploads.
3
Pass context data to templates and redirect users from views.
2
Perform CRUD database operations using Django ORM methods.
1
Configure a media folder in a Django project to store uploaded files.
Recall
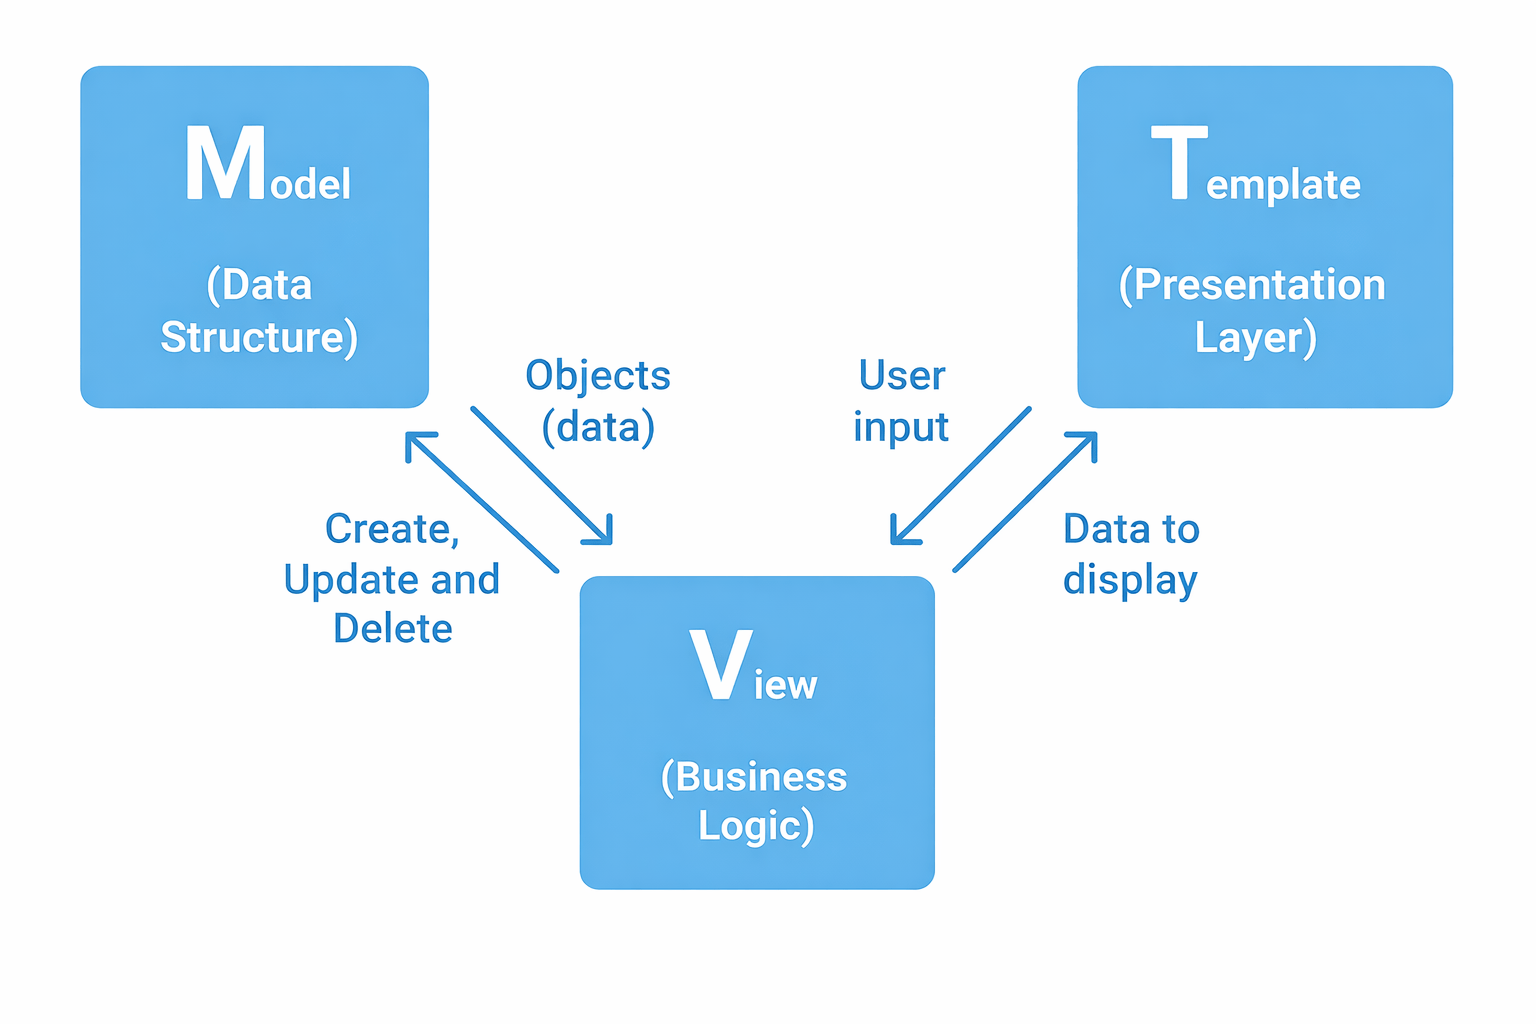
Basic structure of a Django project
Models, Views, Templates (MVT architecture)
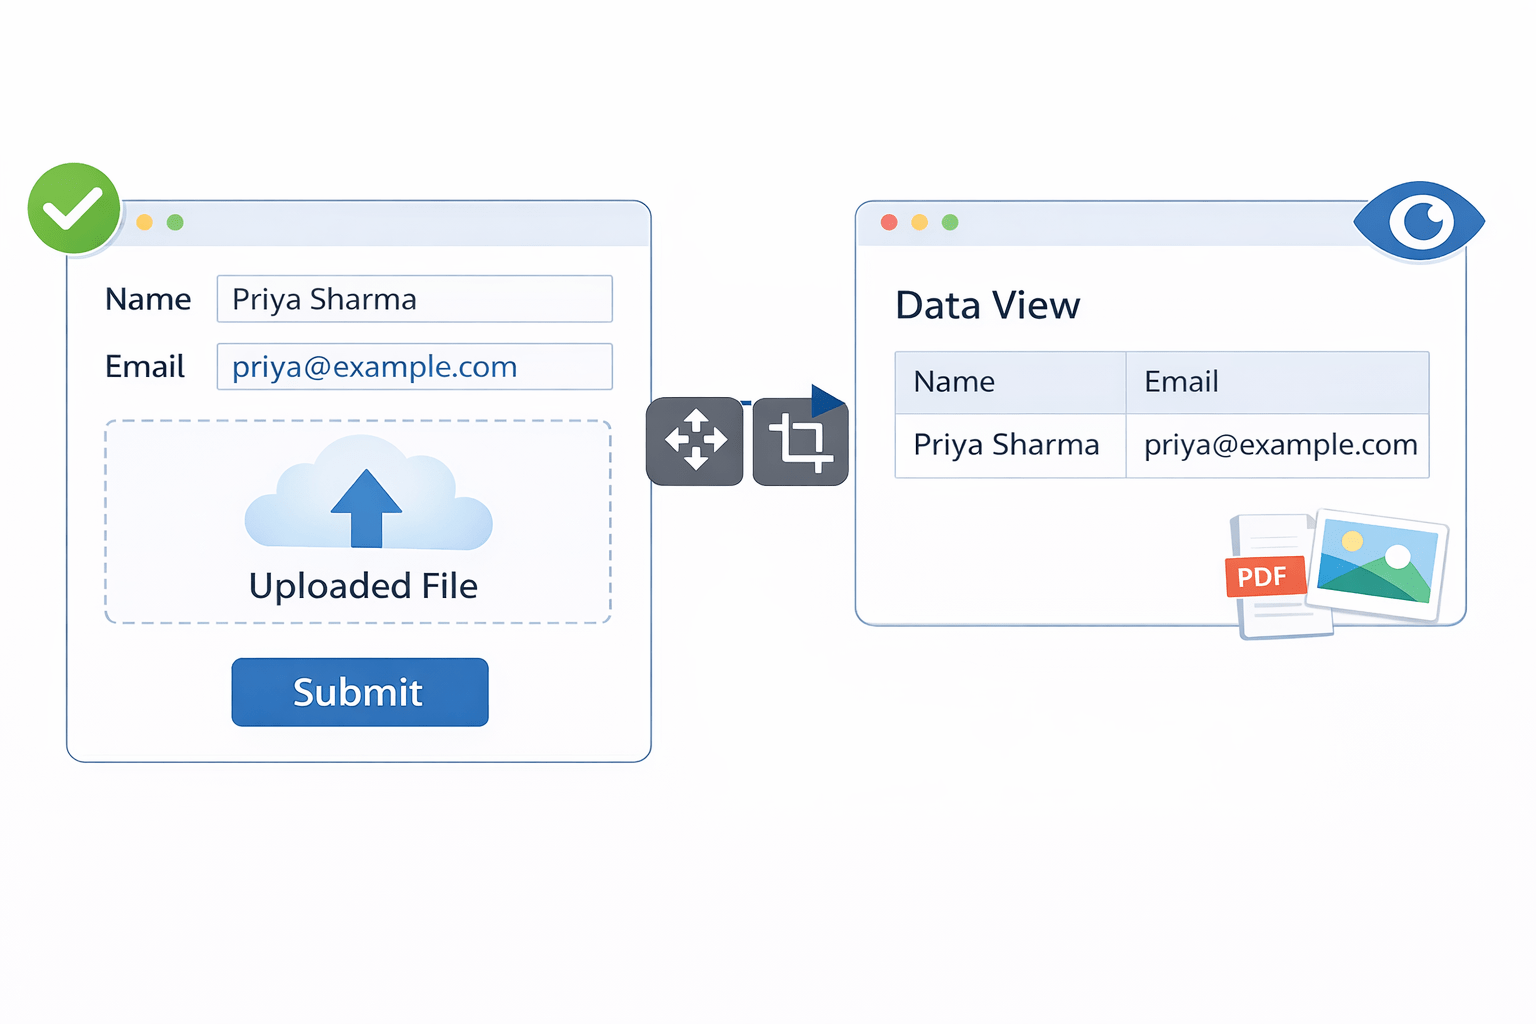
Imagine using an e-commerce website like Amazon
Seller wants to add a new product
Adds product details like name, price, and description.
The product details are saved in the database.
Customers can see the product image clearly on the website.
The system must carefully handle
File uploads
Database storage
Displaying data on the website
Similarly, Django provides structured ways to upload files, store them in the media folder, save their details in the database, and display them using views and templates.
Now, let’s see how to set up the Media Folder in Django with a simple E-commerce example.
Media Folder Configuration
An e-commerce website allows sellers to upload product images.
Configure media settings in settings.py
Folder where files are stored physically
MEDIA_ROOT = os.path.join(BASE_DIR, 'media')URL to access uploaded files
MEDIA_URL = '/media/'Creating Product Model with Image Upload
name → Product name
price → Product price
description → Product description
image → Product image stored inside media/images/
upload_to='images/' → Creates folder inside media
Creating Product Model with Image Upload
from django.db import models
class Product(models.Model):
    name = models.CharField(max_length=200)
    price = models.DecimalField(max_digits=10, decimal_places=2)
    description = models.TextField()
    image = models.ImageField(upload_to='images/')
    def __str__(self):
        return self.name
Store product details and product image.
models.py
Next step is to create a ModelForm to handle the product upload easily
Creating ModelForm for Product Upload
from django import forms
from .models import Product
class ProductForm(forms.ModelForm):
    class Meta:
        model = Product
        fields = ['name', 'price', 'description', 'image']
forms.py
Allow sellers to upload product details and image using a form.
ModelForm connects directly with Product model
Automatically generates form fields
Handling File Upload in Views
1. Upload Product View
from django.shortcuts import render, redirect
from .forms import ProductForm
from .models import Product
from django.core.exceptions import ObjectDoesNotExist
def upload_product(request):
    if request.method == 'POST':
        form = ProductForm(request.POST, request.FILES)
        if form.is_valid():
            form.save()
            return redirect('product_list')
    else:
        form = ProductForm()
return render(request, 'upload_product.html', {'form': form})views.py
Handle product creation and image upload.
2. Display All Products (Using all())
Show all products to customers.
def product_list(request):
    products = Product.objects.all()
return render(request, 'product_list.html', {'products': products})3. Retrieve Single Product (Using get())
Display product detail page.
def product_detail(request, id):
    try:
        product = Product.objects.get(id=id)
    except ObjectDoesNotExist:
        product = None
    return render(request, 'product_detail.html', {'product': product})
get() retrieves single object
Exception handling prevents crash
4. Filter Products (Using filter())
Retrieve products matching condition.
def filter_product(request):
    products = Product.objects.filter(name='iPhone')
return render(request, 'product_list.html', {'products': products})5. Create Product Using create()
Product.objects.create(
    name='Laptop',
    price=55000.00,
    description='Gaming Laptop',
    image='products/laptop.jpg'
)6. Create Product Using save()
product = Product(
    name='Shoes',
    price=1999.00,
    description='Sports Shoes'
)
product.save()A. Delete Single Product
def delete_product(request, id):
    product = Product.objects.get(id=id)
    product.delete()
    return redirect('product_list')
B. Delete Multiple Products
Product.objects.filter(price__lt=500).delete()7. Delete Product (Using delete())
Passing Context to Template
def context_example(request):
    data = {'site_name': 'MyShop', 'version': '1.0'}
return render(request, 'context.html', context=data)Redirect in Views
from django.shortcuts import redirect

def redirect_example(request):
    return redirect('product_list')
redirect() sends user to another URL
Used after form submission
URL Configuration
urls.py
from django.urls import path
from . import views

urlpatterns = [
    path('upload/', views.upload_product, name='upload_product'),
    path('', views.product_list, name='product_list'),
    path('product/<int:id>/', views.product_detail, name='product_detail'),
    path('delete/<int:id>/', views.delete_product, name='delete_product'),
]
Templates
1. product_list.html
<h2>Product List</h2>
{% for product in products %}
    <h3>{{ product.name }}</h3>
    <p>Price: {{ product.price }}</p>
    <img src="{{ product.image.url }}" width="200">
{% endfor %}
enctype="multipart/form-data" is mandatory for file upload
2. upload_product.html
<form method="POST" enctype="multipart/form-data">
    {% csrf_token %}
    {{ form.as_p }}
    <button type="submit">Upload Product</button>
</form>
product.image.url displays uploaded image
3. product_detail.html
<h2>{{ product.name }}</h2>
<p>{{ product.description }}</p>
<p>Price: {{ product.price }}</p>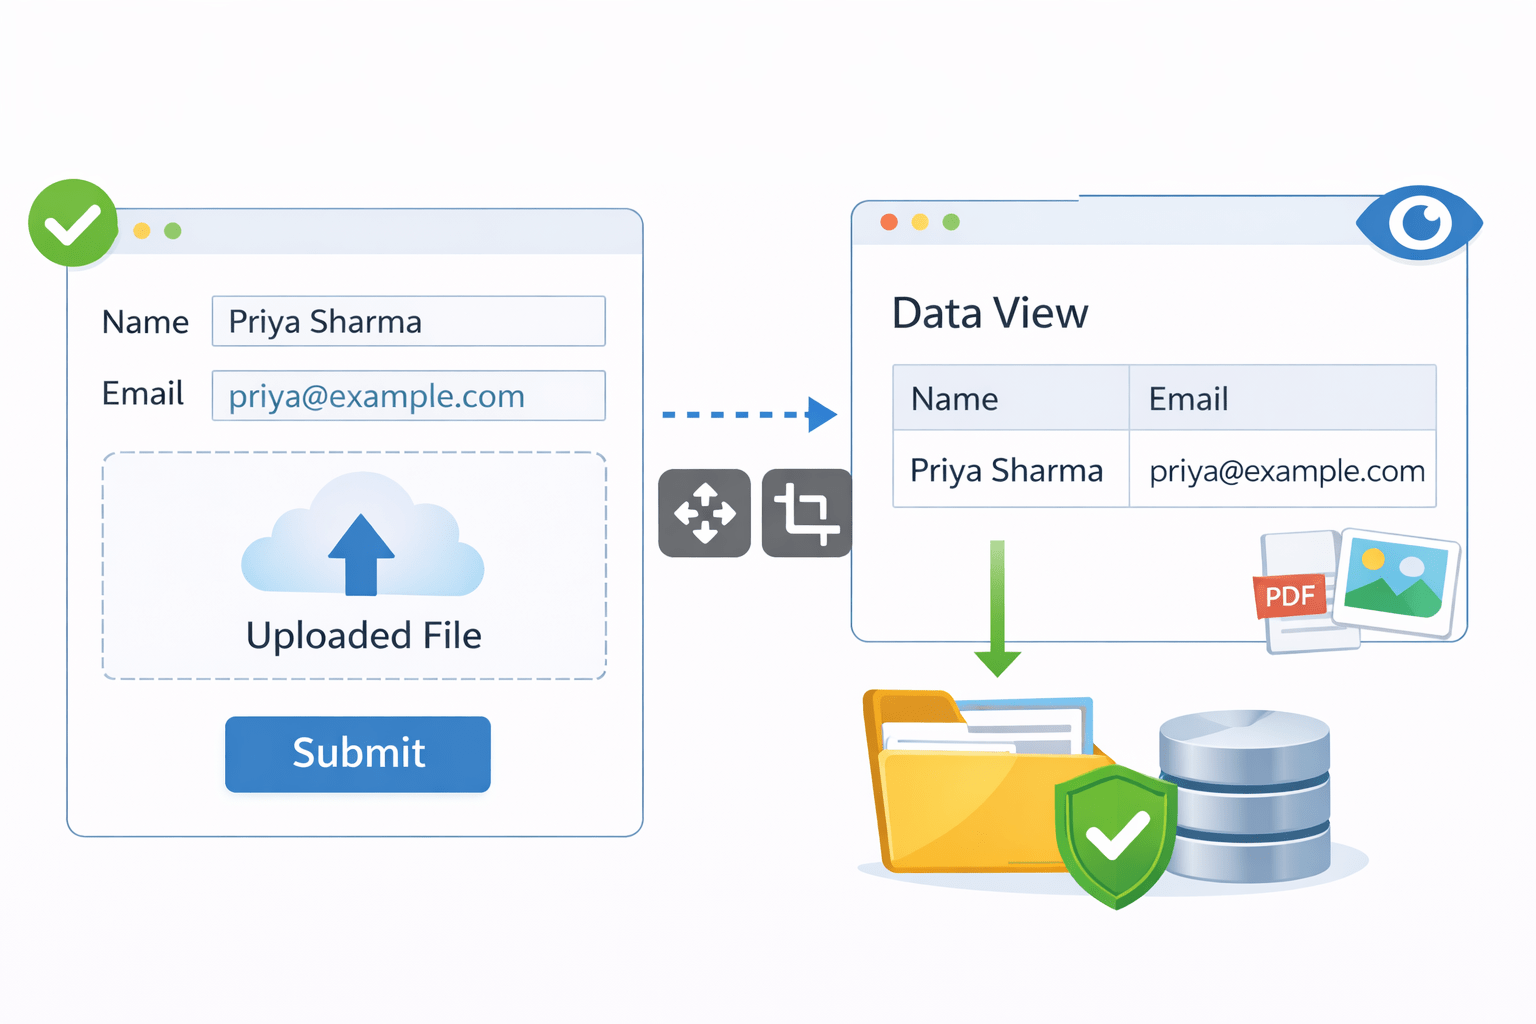
<img src="{{ product.image.url }}" width="300">Overall Flow of Media and Database Handling
User uploads file via form
Form sends data to view.
View validates and saves file.
File stored in media folder.
Summary
4
redirect() helps navigate users to another URL after processing.
3
Context is used to pass data from views to templates.
2
ImageField and FileField are used to handle file uploads.
1
Media folder stores uploaded files in Django projects.
Quiz
Why is request.FILES required while handling file uploads in Django views?
A. To validate URL patterns
B. To access uploaded file data from the form
C. To delete files from the database
D. To redirect users after submission
Quiz-answer
Why is request.FILES required while handling file uploads in Django views?
A. To validate URL patterns
C. To delete files from the database
D. To redirect users after submission
B. To access uploaded file data from the form
By Content ITV


