Understanding the benifits of hedging

Business Scenario
You are working as a Derivatives Risk Analyst at YieldCraft. The market is entering the earnings season, so stock prices may move sharply.
Your company has two unhedged futures positions in Reliance Industries Ltd. (RELIANCE):
-
Portfolio A (Bearish Position): The team has a Short Futures position because they expect the stock price to fall. If the stock price rises after good earnings, the position can suffer very large (unlimited) losses.

Pre-Lab Preparation
-
Portfolio B (Bullish Position): The team has a Long Futures position because they expect the stock price to rise. If the stock price falls due to poor market conditions, the position can suffer heavy losses.
To reduce these risks, the Chief Risk Officer (CRO) has instructed that all futures positions must be hedged before the market closes. Your job is to use Definedge Opstra Strategy Builder to create hedging strategies and compare the results.
Topic : Futures & Options
1) Long and short positions
2) Payoff Chart
3) Contract life cycle
4) Mark-to-market mechanism
Task 1: Hedge the reliance future contract with reliance put option
Part 1: Understand Hedging with a Call Option (Protective Call Strategy)
Why do we use a Call Option for Hedging?
Suppose a trader believes that the price of Reliance Industries will fall. To benefit from this, the trader sells a Futures contract (Short Futures).
- If the stock price falls, the trader earns a profit.
- If the stock price rises, the trader starts making losses.
Since there is no limit to how high a stock price can rise, the loss on a Short Futures position can also become very large.
To reduce this risk, the trader buys an At-The-Money (ATM) Call Option (Strike Price 1320). A Call Option gives the trader the right to buy the stock at a fixed price, even if the market price increases.
Think of a Call Option like an insurance policy. If the stock price rises sharply against your short trade, the Call Option gains value. This gain offsets the loss on the Short Futures position, locking your maximum possible loss to a fixed ceiling.
Open the Opstra Strategy Builder
1
1. Open Google Chrome or any web browser.
2. Visit the Opstra website.
https://opstra.definedge.com/strategy-builder
3. When the Opstra website opens, click Continue with Google.
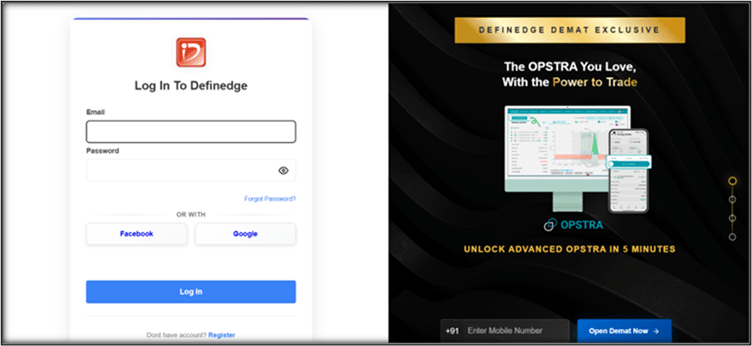
4. Select your preferred Google account to log in
5. If prompted, click Accept or Allow to grant the necessary permissions. After successfully logging in, you will be redirected to the Opstra Dashboard.
Configure and Add Your Futures Position
2
1.From the top navigation menu, click on Strategy Builder the below dashboard will appear .
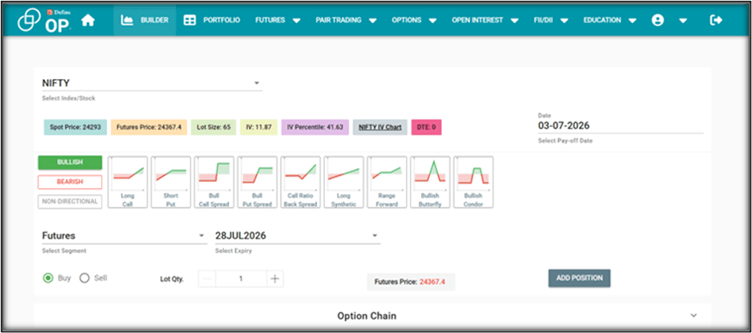
2.In the search bar, select Reliance Industries Ltd. (RELIANCE) as the underlying stock.
3.Set the segment dropdown to Futures and choose your target Expiry Month (e.g., 28JUL2026).
4. Set your trade direction by checking the Sell radio button.
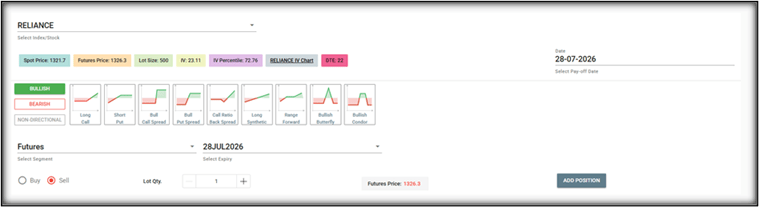
5.Verify the Lot Qty. is set to 1 (which controls 500 shares at an entry price of ₹1,326.30).
6.Click the blue ADD POSITION button.
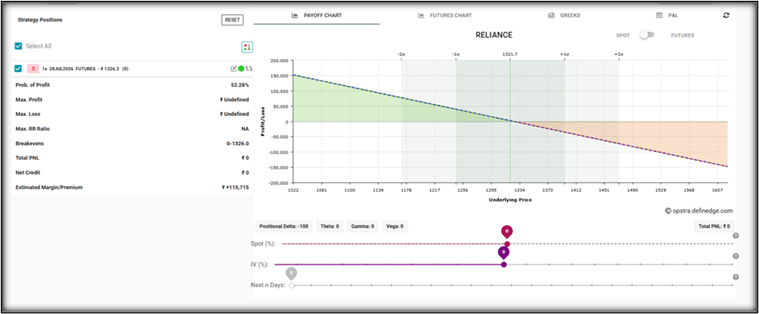
Before adding the hedge, look at the Strategy Positions panel on the left side of your screen:
-
Max Profit: ₹ Undefined (Gains increase as the stock falls toward ₹0).
-
Max Loss: ₹ Undefined (This represents unlimited financial risk if Reliance rallies!)
-
Breakeven Point: Automatically plotted at 0-1326.0 (Opstra rounds the ₹1,326.30 entry price to 1326.0 and displays the profitable range down to zero).
-
Estimated Margin/Premium: Shows ₹ +1,15,715, indicating the heavy capital deposit required by the exchange to hold an unhedged short future.
-
Payoff Chart: You will see a straight diagonal line sloping downward from top-left to bottom-right, plunging into the orange/red loss zone as prices rise above ₹1,326.30.
Observe the Unhedged Risk Metrics (Baseline)
3
Add the Protection Leg (Long Call Option)
4
Now, act as the risk manager and buy upside insurance to cap your risk:
-
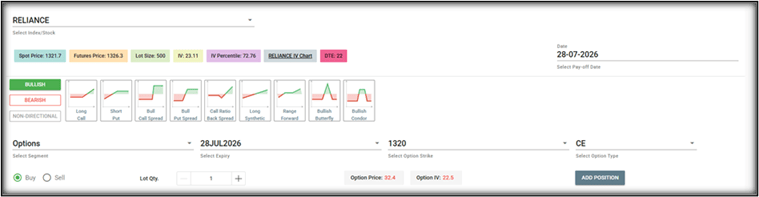
In the configuration console, change the segment dropdown from Futures to Options.
-
Expiry: Keep the matching near-month contract (28JUL2026).
3. Option Strike: Select the 1320 strike line (At-The-Money).
4. Option Type: Choose CE (Call Option).
5. Direction: Check the Buy radio button.
6. Note the live benchmark Option Price (Premium)—as shown in your system, the 1320 CE is trading at ₹32.40 per share.
7. Click the blue ADD POSITION button.
Analyze the Hedged Protective Call Dashboard
5
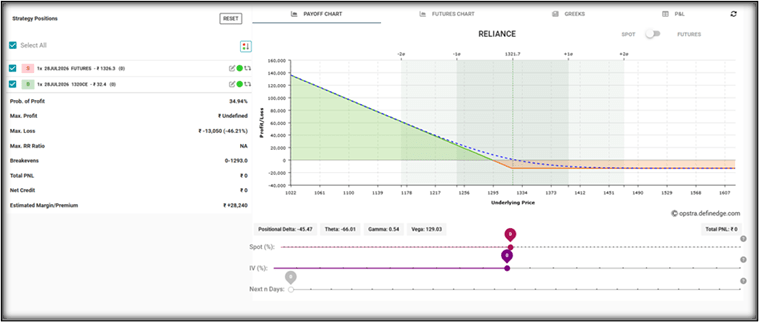
Compare your updated left-side metrics panel against your initial naked baseline:
| Metric | Naked Short Future (Baseline) | Hedged Portfolio (Short Future + Long 1320 CE @ ₹32.40) | Analyst Interpretation & Risk Impact |
|---|---|---|---|
| Max Profit | ₹ Undefined | ₹ Undefined (minus ₹16,200 premium) | You retain massive profit potential if Reliance falls sharply! |
| Max Loss | ₹ Undefined (Unlimited!) | Strictly Capped at -₹13,050 | Risk Solved: Even if Reliance surges to ₹2,000, your loss is locked at . |
| Breakeven Point | 0-1326.0 | 0-1293.0 | Because you paid ₹32.40 per share for option insurance, the stock must drop below ₹1,293.90 () before the trade breaks even (Opstra rounds this display to 1293.0). |
| Capital Margin Required | ₹ +1,15,715 | ₹ +28,240 | Massive Margin Benefit: Because the exchange sees your risk is strictly capped, your required margin deposit drops by over 75% (from ₹1.15L down to just ₹28,240)! |
Visual Chart Analysis: Look at the right-hand side of your Opstra payoff chart (prices rising above ₹1,320). The line no longer plunges downward into infinite loss! Instead, it bends horizontally at the 1320 strike mark, creating a flat ceiling locked inside the red zone at exactly -₹13,050.
Part 2: Hedging a Long Future with a Put Option (Protective Put Strategy)
Why do we use a Put Option to hedge a Long Future?
When a trading desk holds a Long Futures contract, they profit if the underlying stock surges. However, if bad earnings or unexpected negative macroeconomic events hit the market, the asset price can collapse, exposing the desk to steep, unmitigated losses across their 500-share block.
To eliminate this downside crash risk, the risk analyst overlays a long At-The-Money (ATM) Put Option. As shown in our terminal setup, we select the 1320 Put Option (1320 PE), which sits closest to the live spot price of ₹1,321.70. A Put Option serves as a binding contractual guarantee that allows you to sell your underlying shares at the specified strike price (₹1,320.00), no matter how far the broader market plunges.
Think of this as establishing an unbreakable Floor Price for your portfolio. If the market slides, the expanding value of the Put Option directly neutralizes the cascading losses of your long future.
Reset the Terminal and Configure the Long Futures Position
1
-
Navigate to the top-right corner of your Strategy Positions panel and click the RESET button to clear out previous simulations.
-
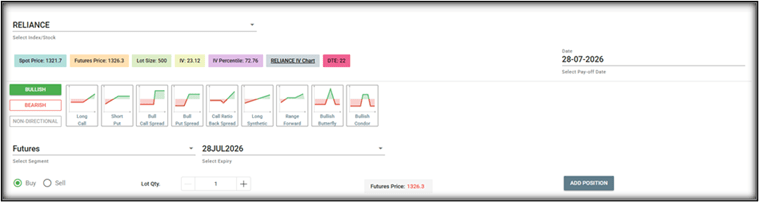
In the primary search console, input Reliance Industries Ltd. (RELIANCE).
-
Configure the baseline bullish position:
-
Segment: Futures
-
Expiry: Select the near-month contract (28JUL2026).
-
Direction: Check the Buy radio button.
-
Lot Qty: Set to 1 (controlling 500 shares at a baseline market entry price of ₹1,326.30).
-
-
Click the blue ADD POSITION button.
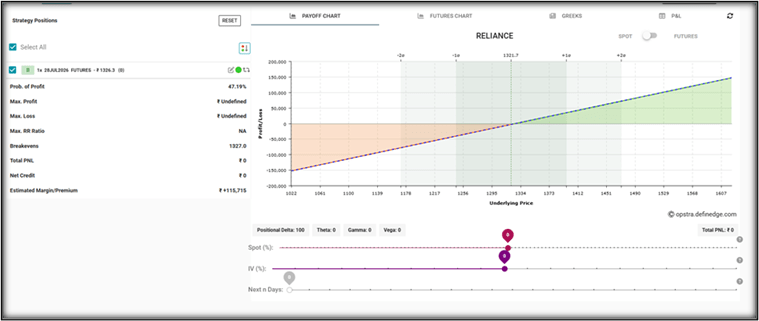
5. Interpretation: Note that your naked Max Loss is ₹ Undefined (the asset value can slide all the way to zero), while the exchange blocks a substantial upfront initial margin of ₹1,15,715.
Add the Risk Protection Leg (Long Put Option)
2
Now, execute the risk management mandate by adding downside portfolio insurance:
-
In the exact same configuration menu, toggle the Segment dropdown from Futures to Options.
-
Expiry: Keep the contract expiry perfectly aligned with your futures leg (28JUL2026).
-
Option Strike: Select the 1320 strike interval (At-The-Money protection).
-
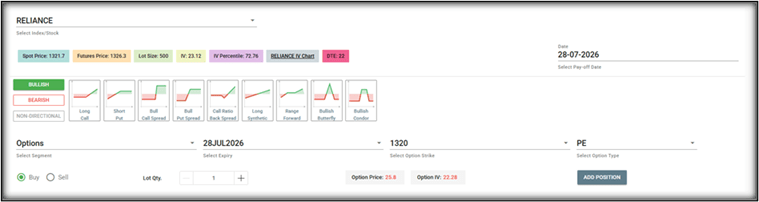
Option Type: Select PE (Put Option).
-
Direction: Check the Buy radio button.
-
Premium Cost: Observe the live option terminal index—the 1320 PE contract is trading at an active premium of ₹25.80 per share.
-
Click the blue ADD POSITION button.
Before you start building anything, you need to clearly understand what the client actually wants.So, let’s begin by understanding the BRD (Business Requirement Document) shared by the client.
BRD Full Form is Business Requirement Details.BRD like a plan for building a house. This plan helps the builder understand what to build.In the same way,BRD tells developers what the client wants to build
Click to download BRD : BiteBox_BRD.pdf
Activity
After going through BRD list down the Core Features and Web Pages in the tabulated Format as shown Below.
| Col 1 | Col 2 | Col 3 |
|---|---|---|
| Row 1 | ||
| Row 2 | ||
| Row 3 |
Formula
Profit = Revenue - Cost
Task 2: Create WireFrame
Now that you understand the requirements, don’t jump into coding yet. Before development, we always visualize the layout.
Now lets create a simple wireframe for the homepage.
A wireframe is like a layout plan of a house. Before building, you decide where rooms, doors, and windows will be placed.Similarly, a wireframe helps you plan where elements like headers, images, and buttons will appear on a webpage—before adding design or colours.
Task 3: Code Editor Installation
Good work on completing the planning phase.
Now we will start development. Before that, make sure your system is ready with the required tools.
In this step we will install the VS code editor that will help to Write code efficiently,Organize files , Run and test your application
Go to the visual studio code official website
1
Click to download Homepage Wireframe : Homepage Wireframe
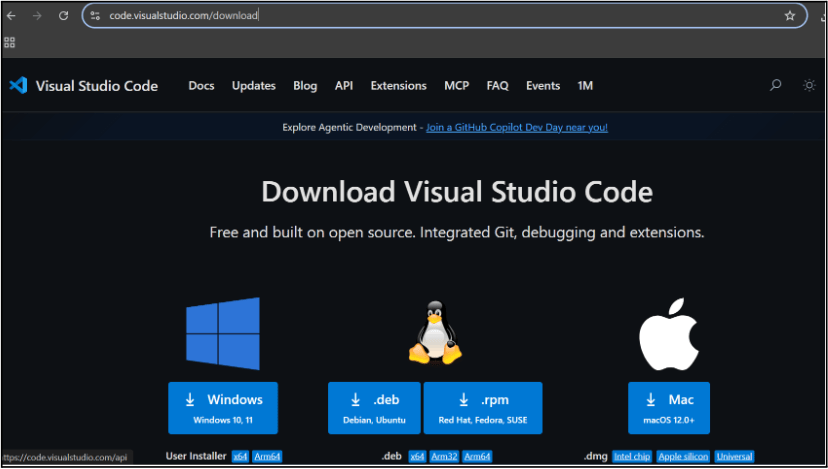
Choose your operating system(windows / Mac) and download the installation file.
Double click on the download app and Accept the agreement and click next
2
It is a long established fact that a reader will be distracted
b
Sub Steps
a
Double click on the download app and Accept the agreement and click next
public class MathSample {
    public static void main(String[] args) {
        int x = 10;
        int y = 20;
        int sum = x + y;

        System.out.println("The sum is: " + sum);
    }
}
public class MathSample {
public static void main(String[] args) {
int x = 10;
int y = 20;
int sum = x + y;
System.out.println("The sum is: " + sum);
}
}
public class MathSample {
public static void main(String[] args) {
int x = 10;
int y = 20;
int sum = x + y;
System.out.println("The sum is: " + sum);
}
}
Great job!
You have successfully completed your first lab on BiteBox Project Onboarding.
In this lab, you have: Understood the BRD, Created a wireframe, Set up your development environment, Organised your project structure, Run your first program
You are now ready to move to the next stage of development
Checkpoint

Next-Lab Preparation
Git Push
git push origin branchNameTopic : Working with a Text and Listin HTML
1) Power of HTML text tags
2) Customizing your style with CSS
3) Listing it right using HTML
4) HTML Link up , attributes of tag, block vs inline elements
Text box Width : 887
Business Scenario, Pre-lab Preparation, Next-lab Preparation, Task, Activity, Checkpoint : 90%.
Steps : 1,2,3 [Sub Steps - a,b,c]
Normal Text, Topic Name : 80%
Subtopic : 70%
Code Box font Size : 16px